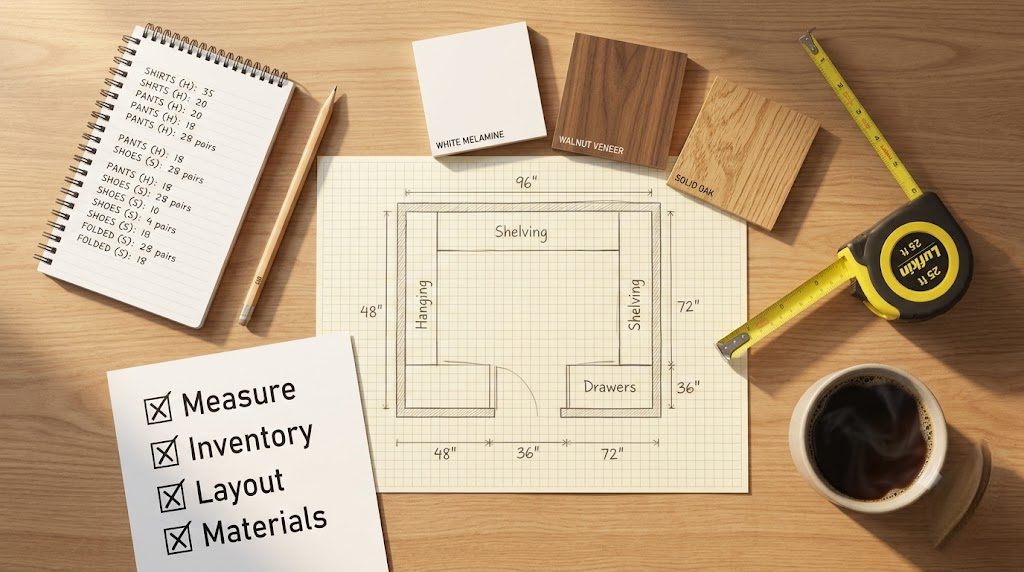
You have read the posts. You have counted your shoes. You have measured your door swing and questioned your single rod and decided, once and for all, that carpet in a closet is not for you. Now it is time to put it all together.
This is the gateway post. The one you bookmark, print, hand to your contractor, or tape to the inside of the empty closet you are about to transform. It pulls every principle from The Bones, The Layout, The Systems, and The Wardrobe Edit into a single sequence of steps. Follow them in order. Skip nothing. The difference between a closet that looks good in photos and a closet that performs at 6:47 a.m. is the discipline to do the unglamorous work first.
Step One: Measure the Real Space
Before you sketch anything, measure. Not the room's exterior dimensions. Not the square footage on the listing. The clear, usable interior space after drywall, after door swing, after soffits and bulkheads and anything else that steals inches.
The Numbers You Need
Measure the width, depth, and ceiling height of the closet in three places each — left, center, right for width; front, middle, back for depth. Walls are rarely perfectly straight or perfectly square. Use the smallest measurement as your working dimension. If the left side measures 94 inches wide and the right side measures 95 inches wide, you have a 94-inch-wide closet. That missing inch is real, and it will matter when you try to fit a 94-inch shelf run into a 93-and-seven-eighths-inch space.
Measure the door. Its width, its swing direction, and the clearance it needs to open fully. If the door swings inward and eats 30 inches of wall space, that wall is not storage. It's clearance. Mark it on your plan as a no-build zone.
Measure the ceiling height at the front, middle, and back of the closet. If the ceiling slopes or varies by more than half an inch, your top shelves will need scribe molding to close the gap. Know this now, not during installation.
Write every dimension on a clean sheet of graph paper. Draw the room to scale. One square equals 3 or 6 inches, depending on the size of your closet. This drawing is your governing document. Everything that follows depends on its accuracy.
Step Two: Inventory Your Actual Wardrobe
Do not skip this step. Do not estimate. Open every drawer, every bin, every garment bag, and the storage containers under your bed. Count every item you own.
The Count That Matters
Count hanging items by type: short hang (shirts, blouses, folded trousers, jackets) and long hang (dresses, coats, maxi skirts, formal wear). Count folded items by category: sweaters, jeans, t-shirts, activewear. Count your shoes. All of them. Then measure your tallest pair of boots, your widest pair of sneakers, and your longest pair of heels. Write these dimensions down.
Now look at the numbers. If you own 45 short-hang items and 6 long-hang items, your closet needs roughly 80 percent double-hang rod space and 20 percent long-hang space. If you own 18 pairs of knee-high boots, your shoe storage plan must accommodate 16 to 18 inches of vertical clearance for at least 18 pairs. The inventory dictates the design. Not the showroom photo. Not the Pinterest board. Your clothes.
Step Three: Design the Layout
With your dimensions and your inventory in hand, start the layout. Work from the constraints outward.
The Non-Negotiables
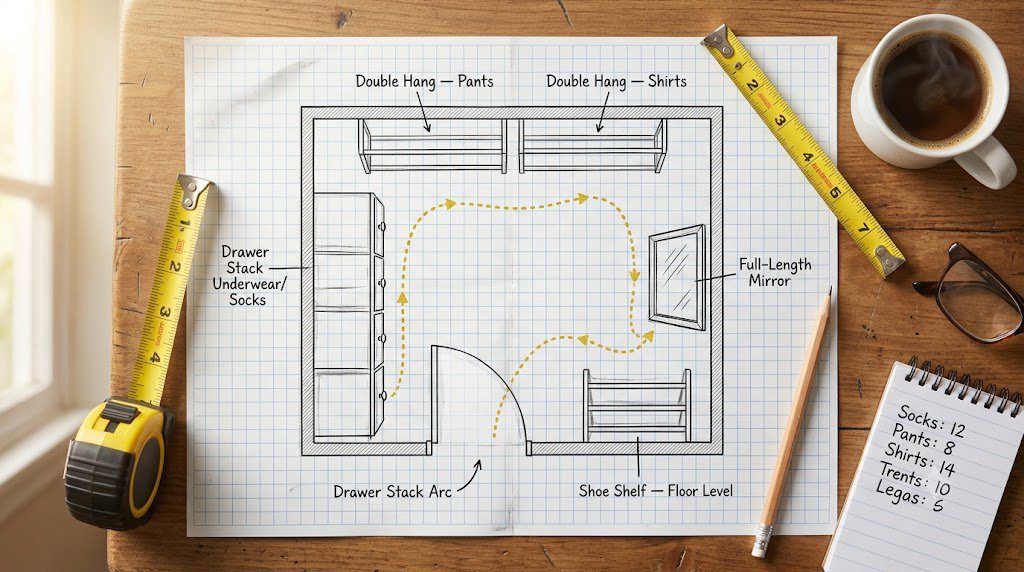
Aisle width: 36 inches minimum for a single-user walk-in, 48 inches for two users. If your clear width minus hanging depth on both sides leaves less than 36 inches, you do not have a walk-in. You have a reach-in, and you will design it brilliantly.
Rod heights: upper rod at 82 inches, lower rod at 42 inches for double-hang. Long-hang rod at 72 inches for dresses and coats. Measure your own body. If you are 5 foot 2, lower the rods. If you are 6 foot 4, raise them. Rod height is not a design opinion. It's an ergonomic fact.
Door swing: if it interferes with storage, change the door or change the layout. An outward-swinging door or a pocket door can reclaim an entire wall of storage.
Map the Getting-Ready Circuit
Start at the entrance. Place the underwear drawer first — waist-high, immediately to the right or left. Then hanging pants and skirts. Then shirts and blouses. Then shoes at floor level. Then the mirror on the far wall or the opposite wall, positioned where the light hits your body. This is the circuit you walk every morning. Design the closet around it, not the other way around.
Step Four: Choose Your Materials
Now you know what you are building. The final choice is what you are building it from.
The Material Hierarchy
Melamine for upper shelves, hidden panels, and budget-conscious builds. Insist on a minimum 1mm PVC edge band. Wood veneer on plywood for visible drawer fronts and shelf faces where you want warmth without the solid-wood cost. Solid wood for drawer boxes, island countertops, and pieces you want to last multiple decades. Soft-close undermount drawer slides on every drawer. No exceptions.
Lighting: 3000K LED, layered. Overhead fixtures for general illumination. Integrated shelf lighting for task visibility. Side lighting at face height flanking the mirror. One single ceiling dome in the center of the room is a design failure. Do not commit it.
Flooring: luxury vinyl plank or engineered hardwood. No carpet unless you have a compelling, climate-controlled reason. No tile unless you are installing radiant heat underneath.
Step Five: Execute
Hire your contractor. Or don't — a PAX system with custom trim can be installed by a competent DIYer with a level and a stud finder. Either way, the plan you have built over the previous four steps is your contract with reality. Do not deviate from it in response to a salesperson's upsell. Do not add an island your room cannot support. Do not upgrade to solid walnut drawer boxes unless you have budgeted for them and your wardrobe justifies the expense.
Install the bones first. Electrical rough-in before drywall. Flooring before cabinetry. Lighting before shelves. Then the systems. Then the wardrobe goes in last, organized by the circuit you designed, in the order you reach for things.
This is the plan. It is not glamorous. It is not fast. It does not promise a sanctuary or a retreat or a boutique at home. It promises something better: a closet that works. Every shelf, every rod, every drawer, every morning. Start here. Do the steps. Build the room your wardrobe deserves — not the one a showroom wants to sell you.




No comments yet — be the first to share a thought.